Mostly, all computer users have some important files on their computers which they don’t want any third party to have access to due to privacy and some other factors. Although, there are hundreds of software available in the market to encrypt/hide our files, but most of the programs are paid and the most disgusting part is that you may have to format your computer in case you forgot your password, which will in turn make you lose the files you are protecting.
 But today, I want to show you the easiest way to hide your computer local drive without installing any 3rd party software and you don’t have to remember any password. This method will save you money, time and protect your files. This tutorial will explain how you can use windows command prompt (cmd) to hide any local drive on your PC.
Before you proceed, check:
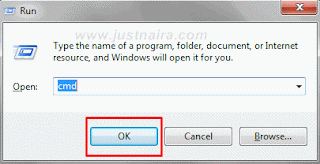
 2. Type cmd into the run command and then click ok
 3. After step 2, a windows command prompt window appears, now type diskpart in it and then hit enter
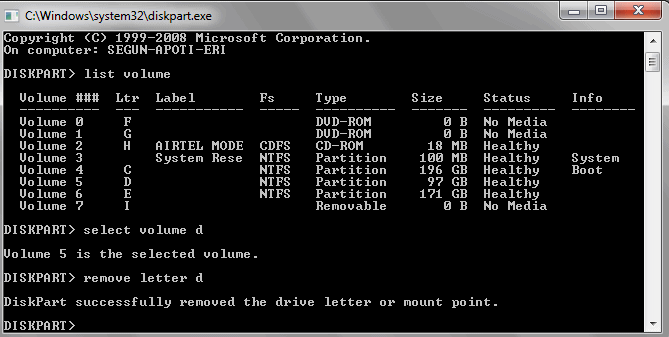
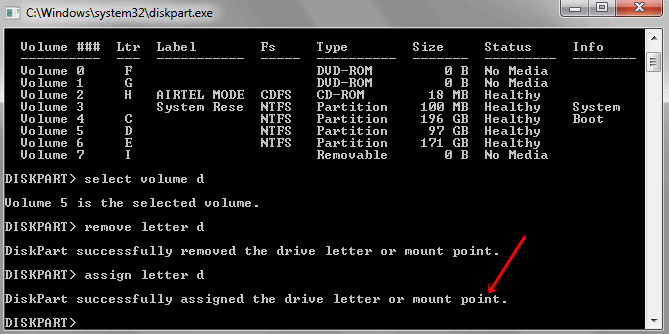
4. A new window will appear, type list volume and then hit enter to show the list of local drive that is available on your PC
5. If for instance, I want to hide local drive D on my pc, then I will type select volume D into the command prompt and then hit enter.
6. To hide drive D, I will then type remove letter D into the command prompt and then hit enter. Study the Image below and step 1-5 for better understanding.
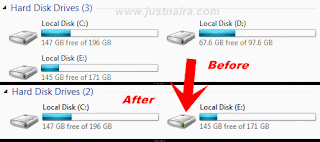
 7. Immediately after step 6, the hard drive D will disappear from my hard drive list as seen in the image below:
2. So instead of remove letter D I typed in step 6 above, I will type assign letter D to make the hidden hard drive visible.
 For questions regarding this tutorial, don’t hesitate to use the comment box.

Before you proceed, check:
- http://profsmythe.blogspot.com /2016/01/how-to-clean-pc-ram-without-notepad.html" target="_blank">How to Enhance Computer Performance with Notepad
- How to Hide Files and Folders on PC with Command Prompt
- http://profsmythe.blogspot.com /2016/01/how-to-use-windows-host-files-to-block.html" target="_blank">Block Access to Certain Website on PC without Software
- http://profsmythe.blogspot.com /2016/01/how-to-check-if-your-antivirus-is-real.html" rel="" target="_blank">Check if your PC Antivirus is Real/Fake
How to Hide your Local Drive with Windows CMD
1. Click on WIN+R on your computer to launch run command

4. A new window will appear, type list volume and then hit enter to show the list of local drive that is available on your PC
5. If for instance, I want to hide local drive D on my pc, then I will type select volume D into the command prompt and then hit enter.
6. To hide drive D, I will then type remove letter D into the command prompt and then hit enter. Study the Image below and step 1-5 for better understanding.


How to Un-Hide your Local Drive with Windows CMD
1. Follow step 1-4 explained above, then after I will select the volume I have hide by typing select volume D into the command prompt and then hit enter2. So instead of remove letter D I typed in step 6 above, I will type assign letter D to make the hidden hard drive visible.


0 comments:
Post a Comment